

Key Highlights
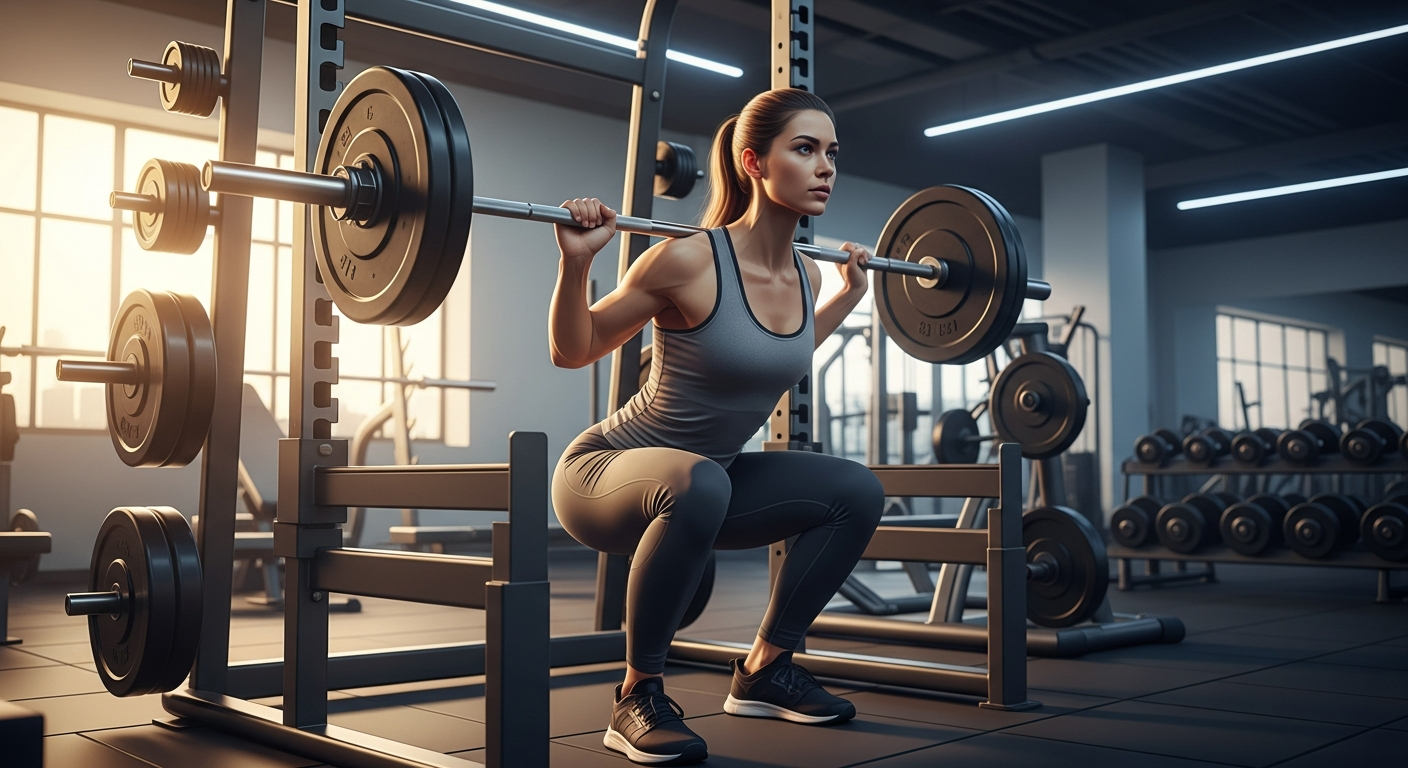
- The Back Barbell Squat is a key compound exercise targeting your lower body. Use a squat rack for safety and proper setup.
- Before starting, warm up with dynamic stretches like bodyweight squats, leg swings, hip circles, and lunges to activate the main muscle groups. Master correct form—keep your chest up and back straight—before adding weight to prevent injury.
- Benefits include greater lower body strength, muscle growth, and improved bone density. Beginners should start with bodyweight squats to build a foundation.
- Alternative exercises for leg strength include lunges, leg presses, Bulgarian split squats, and step-ups. These also promote muscle growth and strength when done with good form.
Introduction
Welcome to the world of strength training! If you've been looking for a powerful exercise to add to your routine, the Back Barbell Squat is a fantastic place to start. As a beginner, tackling the barbell might seem intimidating, but this movement is a staple for a reason. It's a highly effective exercise that builds strength and muscle. This guide will walk you through everything you need to know, from proper form to different squat variations, ensuring you feel confident and ready to master this classic lift.
Understanding the Back Barbell Squat
The back barbell squat is one of the most recognized exercises in any gym. It involves squatting with a barbell resting across your upper back, specifically on the trapezius muscles. This exercise is a powerhouse for building lower body strength, engaging multiple muscle groups simultaneously.
While there are many squat variations, the back squat is unique in how it distributes weight. Maintaining good form is essential to target the right muscles and avoid injury. Let's look at what makes this exercise special and how it compares to other types of squats.
What Makes the Back Barbell Squat Unique?
The defining feature of the Back Barbell Squat is the placement of the barbell on the back of the shoulders. This position allows your body to stabilize and balance the load more effectively, which means you can often lift heavier weights compared to other squat variations. This ability to progressively overload is a key benefit for building maximum strength and muscle.
As a compound movement, the back squat is incredibly efficient. It doesn't just work one muscle; it recruits a large number of muscle groups throughout your entire body. From your legs and glutes to your core and upper back, many muscles are working in unison to perform the lift.
This comprehensive muscle engagement leads to significant benefits beyond just leg day. You'll see improvements in overall strength, bone density, and even your performance in other athletic activities. The functional nature of the movement also translates directly to everyday activities, making tasks like sitting and standing easier.
Back Barbell Squat vs. Other Squat Variations
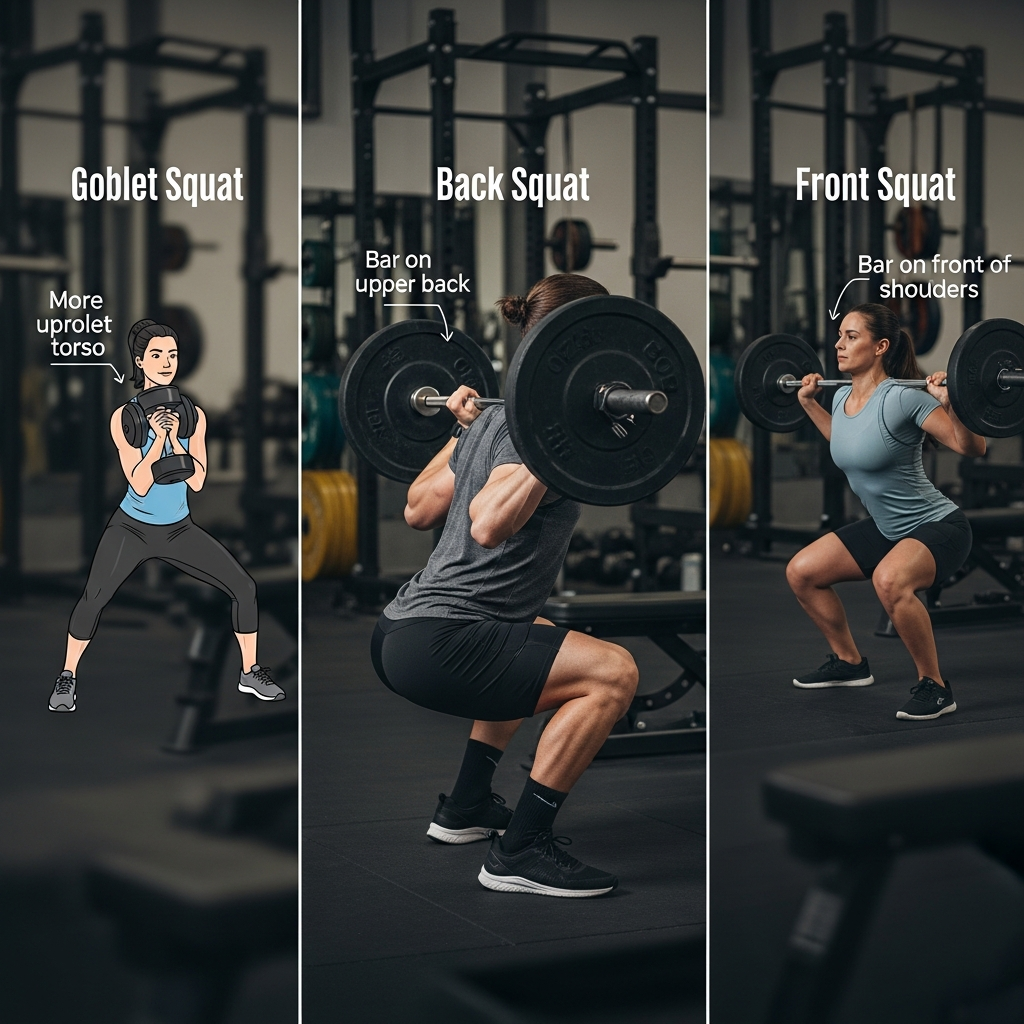
While the barbell back squat is a fantastic exercise, it's just one of many squat variations. Each type offers unique benefits and targets muscles slightly differently. For example, front squats place more emphasis on your quadriceps and core due to the barbell's position on the front of your shoulders.
Goblet squats, performed with a dumbbell or kettlebell held at your chest, are excellent for beginners learning the squat pattern. They help you maintain an upright torso. Bodyweight squats are the foundational movement, perfect for mastering form without any added weight.
Understanding the differences can help you choose the right exercise for your goals. The barbell back squat is particularly effective for building overall lower body mass and strength because it engages the powerful posterior chain (glutes and hamstrings) more heavily.
|
Squat Variation |
Primary Focus |
Equipment |
|---|---|---|
|
Barbell Back Squat |
Posterior chain (glutes, hamstrings), overall strength |
Barbell, Squat Rack |
|
Front Squats |
Quadriceps, Core stability |
Barbell, Squat Rack |
|
Goblet Squat |
Form practice, Quads, Core |
Dumbbell or Kettlebell |
|
Bodyweight Squats |
Foundational movement, mobility |
None |
(ALSO READ: 8 Must-Try Barbell Workouts for Total Body Strength)
Step-by-Step Guide to Performing a Back Barbell Squat
Ready to perform your first Back Barbell Squat? Following a clear, step-by-step process is the key to executing the movement safely and effectively. Proper setup in the squat rack is the first and most important part of the process. This ensures you can unrack and re-rack the barbell securely.
Once you're set up, the focus shifts to your body mechanics—finding the right stance, grip, and squatting depth. Nailing these details from the start helps you build good habits, perform clean reps, and achieve good form for long-term success.
Step 1: Setting Up Your Barbell and Rack
Your journey begins at the squat rack, also known as a power rack. Proper setup here is non-negotiable for safety. Start by adjusting the height of the barbell. You want it to be positioned just below your shoulder height. This allows you to comfortably get under the bar and lift it off the rack by simply straightening your legs, without having to go on your tiptoes.
Next, set the safety pins or bars. These are your safety net if you can't complete a rep. To find the right height, perform a bodyweight squat and see where your lowest point is. Set the pins just below that depth, so they can catch the barbell if needed but won't interfere with your range of motion.
Here’s a quick checklist for your setup:
- Position the barbell in the rack just below your shoulders.
- Set the safety pins slightly below the bottom of your squat depth.
- Ensure the area around the rack is clear of any obstacles.
Step 2: Finding Your Optimal Stance and Grip
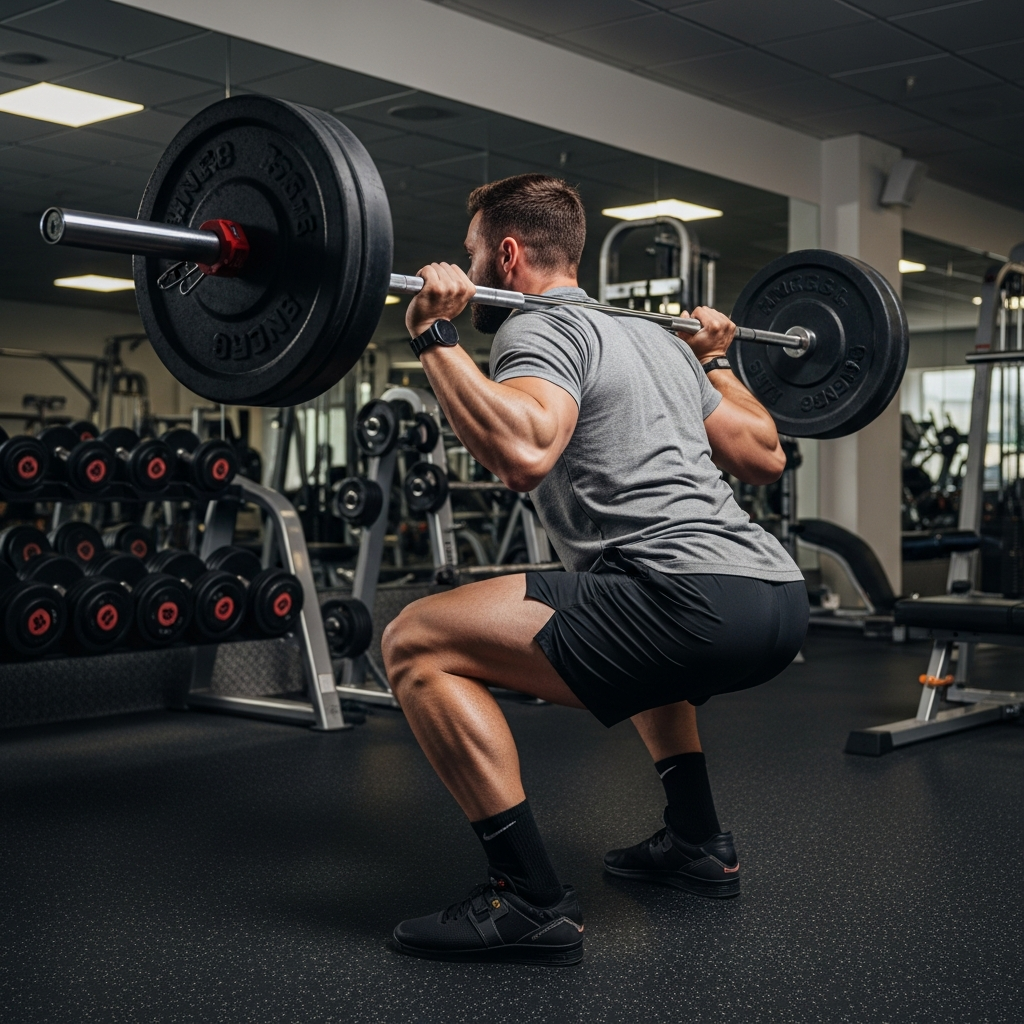
With the rack ready, it's time to get under the barbell. Position yourself so the bar rests on your upper back muscles, not directly on your neck. Squeeze your shoulder blades together to create a muscular "shelf" for the bar to sit on. This stabilizes your upper body and protects your spine. Your grip should be just outside of shoulder-width, holding the bar firmly.
Now, let's talk about your stance. Foot placement is highly individual, but a good starting point is to place your feet slightly wider than your hips with your toes pointed forward or slightly outward (no more than 10 degrees). This neutral stance allows most people to squat to depth comfortably while maintaining balance.
Experiment a little to find what feels most natural for your body. Here's what to aim for:
- Feet just outside hip-width.
- Toes pointing forward or slightly out.
- A firm grip on the barbell to create tension in your upper back and protect your lower back. Stand up to unrack the bar, take two or three steps back, and you're ready to squat.
Step 3: Mastering the Squatting Movement and Depth
Now for the main event: squatting. Take a deep breath into your belly to brace your core—engage your abs as if you're about to take a punch. This creates internal pressure that helps stabilize your spine. Begin the movement by simultaneously pushing your hips back and bending your knees, as if you're sitting down in a chair.
As you lower yourself, keep your chest up and drive your knees outward to prevent them from caving in. Aim to lower yourself until your thighs are at least parallel to the floor. This depth is generally considered ideal for activating all the major muscle groups like the quads, glutes, and hamstrings.
From the bottom of the squat, drive through your feet to push the ground away and return to the starting position.
- Keep your chest lifted and your back straight throughout the movement.
- Bend your knees and drop your hips until your thighs are level with the ground.
- To finish the repetition, contract your glutes tightly when you reach the top of the motion.
(ALSO READ: Barbell Back Squat Alternative )
Key Muscles Targeted by the Back Barbell Squat
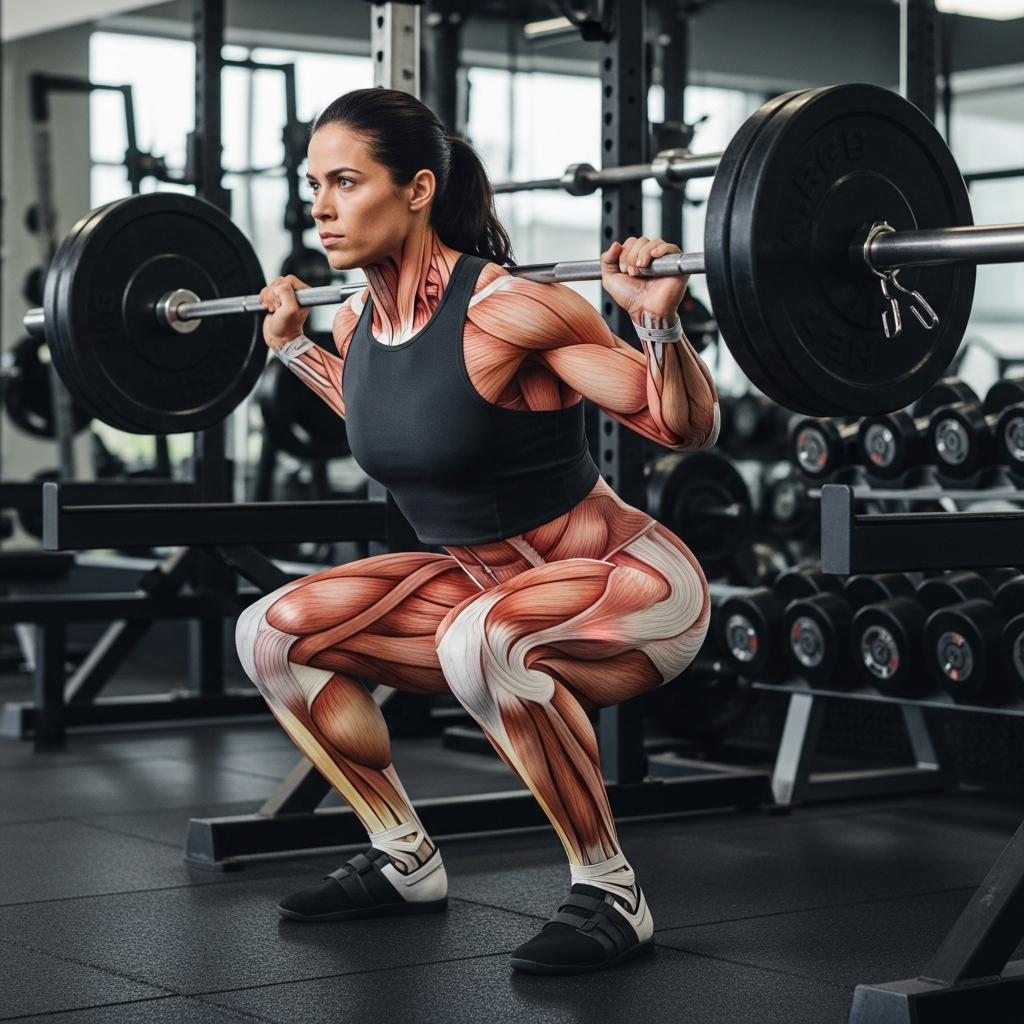
The back squat is renowned as a comprehensive lower body exercise, and for good reason. It’s a true powerhouse for building lower body strength because it engages some of the largest muscle groups in your body all at once. The primary movers are your quads, glutes, and hamstrings.
But the work doesn't stop there. Your core, including your lower back, and even your upper back muscles play a crucial stabilizing role. Let's break down which muscles are doing the heavy lifting and which ones are providing that all-important support.
Primary Muscle Groups Worked
The barbell back squat is fundamentally a lower body exercise. The primary muscles driving the movement are located in your legs and hips. Your quadriceps, the large muscles on the front of your thighs, are heavily engaged as you extend your knees to stand back up from the bottom of the squat.
Simultaneously, your glutes (gluteus maximus) work powerfully to extend your hips. Squeezing your glutes at the top of the lift ensures you fully engage them. The hamstrings, located on the back of your thighs, also play a significant role, working alongside the glutes to control the descent and assist in the upward drive.
Together, these three muscle groups form the core engine of the squat. This is why the exercise is so effective for building a strong and well-developed lower body. Consistent training will lead to noticeable gains in both size and strength in these key areas.
Supporting Muscles Engaged During the Movement
While your legs do the heavy lifting, a host of supporting muscles work hard to keep you stable and safe. Your core is at the forefront of this effort. Your abs and obliques brace your midsection, creating a rigid torso that protects your spine under load. The erector spinae, the muscles running along your spine, work to keep your back straight and prevent it from rounding.
Your upper back muscles, including the traps and rhomboids, are also actively engaged. They create a solid shelf for the barbell to rest on and help maintain an upright posture throughout the lift. This teamwork between different muscle groups is what makes the squat such a great exercise for improving overall coordination.
Effectively, the back squat is a full-body movement in disguise. It teaches your muscles to work together as a single, powerful unit, which is a skill that translates to better performance in almost any physical activity.
Benefits of Adding Back Barbell Squats to Your Routine
Incorporating the back squat into your strength training workout routine offers a wealth of benefits that go far beyond just building bigger legs. As a compound exercise that engages large muscle groups, it's incredibly efficient for stimulating muscle growth and burning calories.
Whether your goal is to get stronger, improve your athletic performance, or enhance your everyday functional fitness, the back squat delivers. We'll explore the specific advantages for muscle development and how this single exercise can improve your mobility and daily life.
Strength and Muscle Development Advantages
One of the most significant benefits of the back squat is its ability to stimulate muscle growth, a process known as hypertrophy. By placing multiple large muscle groups under a heavy load, you create the ideal environment for building serious lower body strength. The back-racked position lets you lift more weight, challenging your muscles to adapt and grow stronger.
Beyond muscle, this form of strength training is also fantastic for your bones. Weight-bearing exercises like squats help increase bone density. This is particularly important as we age, as it can help counteract the natural decline in bone mass and reduce the risk of fractures.
Investing time in back squats during early adulthood can set you up for better bone health later in life. It's a proactive way to build a stronger, more resilient body from the inside out.
Functional Fitness and Everyday Mobility
The back squat is the king of functional fitness, and for good reason. The movement pattern directly mimics many actions you perform every single day. Think about sitting down and standing up from a chair, getting out of your car, or picking something up off the floor. These are all squat variations.
By strengthening the muscles and reinforcing these movement patterns in the gym, you make those everyday tasks feel easier and reduce your risk of injury. Improved coordination is another key benefit. The squat teaches your lower body, core, and upper body to work together seamlessly.
This transfer of strength and skill from the gym to daily life is what functional fitness is all about. It’s not just about looking strong; it’s about being capable and mobile in all aspects of your life. That alone is a good reason to make squats a regular part of your routine.
(ALSO READ : Hack Squat vs Barbell Squat: Which One Builds More Muscle?)
Essential Equipment and Preparation for Beginners
As a beginner, gearing up for your first barbell squat session requires a bit of preparation. Both safety and effectiveness depend heavily on having the proper equipment.
The most important piece of equipment is a squat rack, which provides a secure station to perform the lift. A standard barbell, which typically weighs 45 lbs, is your next essential.
Beyond the core equipment, thinking about your attire and other potential safety gear can make your experience more comfortable and secure. Let's review what you'll need to get started on the right foot.
Choosing the Right Barbell and Weights
When you're just starting, the barbell itself is often enough weight. A standard Olympic barbell weighs 45 lbs (or around 20 kg), which is a significant load for a beginner. Some gyms also have lighter "women's" barbells that weigh 35 lbs (15 kg), which can be a great starting point. The key is to begin with just the bar to master the form before adding any extra weights.
Don't feel pressured to load up the plates immediately. Your primary goal is to learn the movement pattern correctly. Once you can comfortably perform several sets of 8-12 reps with the empty barbell while maintaining good form, you can start adding a small amount of weight, like 5-10 lbs at a time.
Always perform your squats inside a squat rack with the safety bars correctly positioned. This ensures that if you fail a rep, you can safely bail out without risking injury. This is the single most important safety measure for any lifter.
Proper Attire, Footwear, and Safety Gear
What you wear to squat can make a surprising difference. Choose comfortable, flexible attire that doesn't restrict your movement. You need to be able to move freely as you descend into the squat. More importantly, focus on your footwear. For squatting, the ideal shoes are those that are stable and flat, ensuring a firm grip on the floor.
Avoid wearing cushioned running shoes, as their soft soles can create instability, increasing your risk of injury. A hard, flat sole helps you maintain balance and transfer force efficiently through the floor. Weightlifting shoes with a raised heel are an option, as they can help with ankle mobility, but a simple pair of flat-soled sneakers will work perfectly for a beginner.
For safety gear, remember these points:
- Always use the safety bars in the squat rack.
- Consider asking an experienced lifter or trainer for a spot when you start lifting heavier.
- Pay attention to your body’s signals and avoid forcing yourself through discomfort.
Common Mistakes to Avoid for Beginners
As a beginner, it’s natural to make a few mistakes while learning a new, technical lift like the back squat. However, being aware of the common pitfalls can help you avoid them, reducing your risk of injury and ensuring you get the most out of the exercise. Two of the biggest mistakes are using improper form and overloading weight too soon.
Focusing on good form from day one is far more important than how much you lift. Additionally, skipping warm-ups is a frequent error that can lead to problems. Let's look at these common issues so you can build a strong and safe squatting habit.
Incorrect Form and Posture Issues
One of the most common and dangerous form mistakes is allowing your back to round, a problem known as spinal flexion. This often happens when the weight is too heavy or when an individual's core is not properly braced. A rounded back places immense stress on the spine and can lead to serious injury. Always focus on keeping your chest up and your back straight throughout the entire movement.
A common mistake is allowing your knees to collapse inward.This can put undue stress on your knee joints. To combat this, actively think about driving your knees out as you squat down. This helps engage your glutes and keeps your knees tracking safely over your feet.
Here are a few key posture points to watch for:
- Keep your torso as upright as possible.
- Avoid rounding your lower back by keeping your chest lifted.
- Don't let your knees collapse inward.
Overloading Weight and Skipping Warm-Ups
Ego lifting, or overloading weight before you're ready, is a recipe for disaster. It's tempting to add more lbs to the bar, but doing so at the expense of good form will only hinder your progress and increase your risk of injury. Start with a weight that allows you to complete all your reps with perfect technique. Quality over quantity is the rule.
Another critical mistake is skipping your warm-ups. Your muscles need to be prepared for the demands of a heavy compound lift. A proper warm-up increases blood flow to the muscles, improves mobility in your hips and ankles, and activates your central nervous system. This not only reduces injury risk but also improves your performance during the workout.
Remember these simple rules:
- Begin using a lighter weight and concentrate on maintaining proper form.
- Only increase the weight when you can consistently hit your target reps with good technique.
- Always perform a thorough warm-up with dynamic stretches and mobility drills before you squat.
Conclusion
In conclusion, the back barbell squat is a powerful exercise that not only enhances strength and muscle development but also promotes functional fitness. As a beginner, focusing on proper form, technique, and avoiding common mistakes is crucial to maximizing your workout and minimizing injury risks. Don't forget to select the right equipment and prioritize safety in your routine. By incorporating the back barbell squat into your fitness journey, you'll be well on your way to achieving your goals and improving your overall mobility. If you have more questions or need help getting started, feel free to reach out for a free consultation!
Frequently Asked Questions
Can you explain how to perform the back barbell squat with proper form?
To perform a back squat with proper form, start with a solid setup in a squat rack. Place the barbell on your upper back, not your neck. Keep your chest up, back straight, and core braced. Squat down until your thighs are parallel to the floor, then drive through your feet to return to the start.
What muscles does the back barbell squat work the most?
The back squat primarily works the major muscle groups of your lower body. The main movers are the quadriceps (quads), glutes, and hamstrings. Supporting muscles like the lower back, abs, and upper back are also heavily engaged to stabilize your body throughout the movement, making it a comprehensive exercise.
REFERENCE:
https://www.acefitness.org/resources/everyone/exercise-library/135/bodyweight-squat/
https://journals.lww.com/acsm-healthfitness/fulltext/2022/03000/the_front_squat_exercise.10.aspx
