

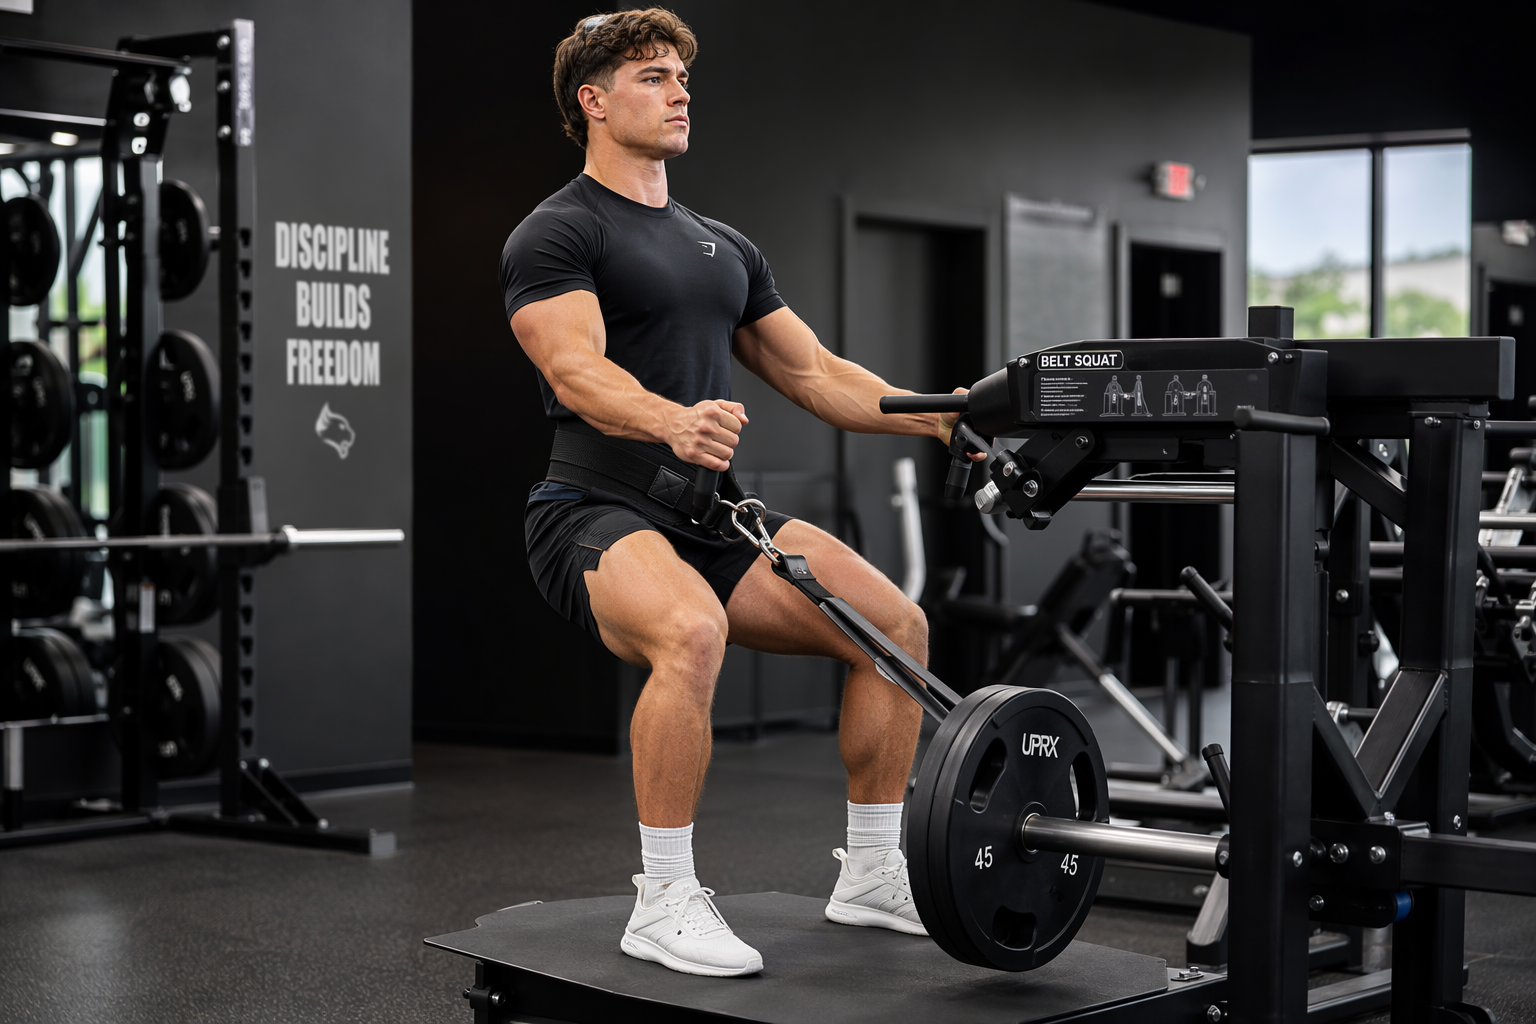
Key Highlights
- A belt squat is an effective tool for building lower body strength with less stress on your spine.
- A good squat machine setup starts with the right belt fit, foot placement, and manageable loading.
- Proper form helps you train your glutes, quads, and hamstrings safely and more effectively.
- Commercial and home gym belt squat options offer different levels of stability, versatility, and convenience.
- Smart setup choices can improve comfort, workout quality, and long-term progress.
Introduction
If you want a new way to train your lower body without the usual strain of a bar on your back, the belt squat is worth your attention. This setup shifts the load to your hips through a squat belt, helping you work your legs hard while reducing pressure on your spine. It can fit beginners and experienced lifters alike. Once you understand the setup, you can make each session safer, smoother, and more productive.
Understanding the Belt Squat Setup
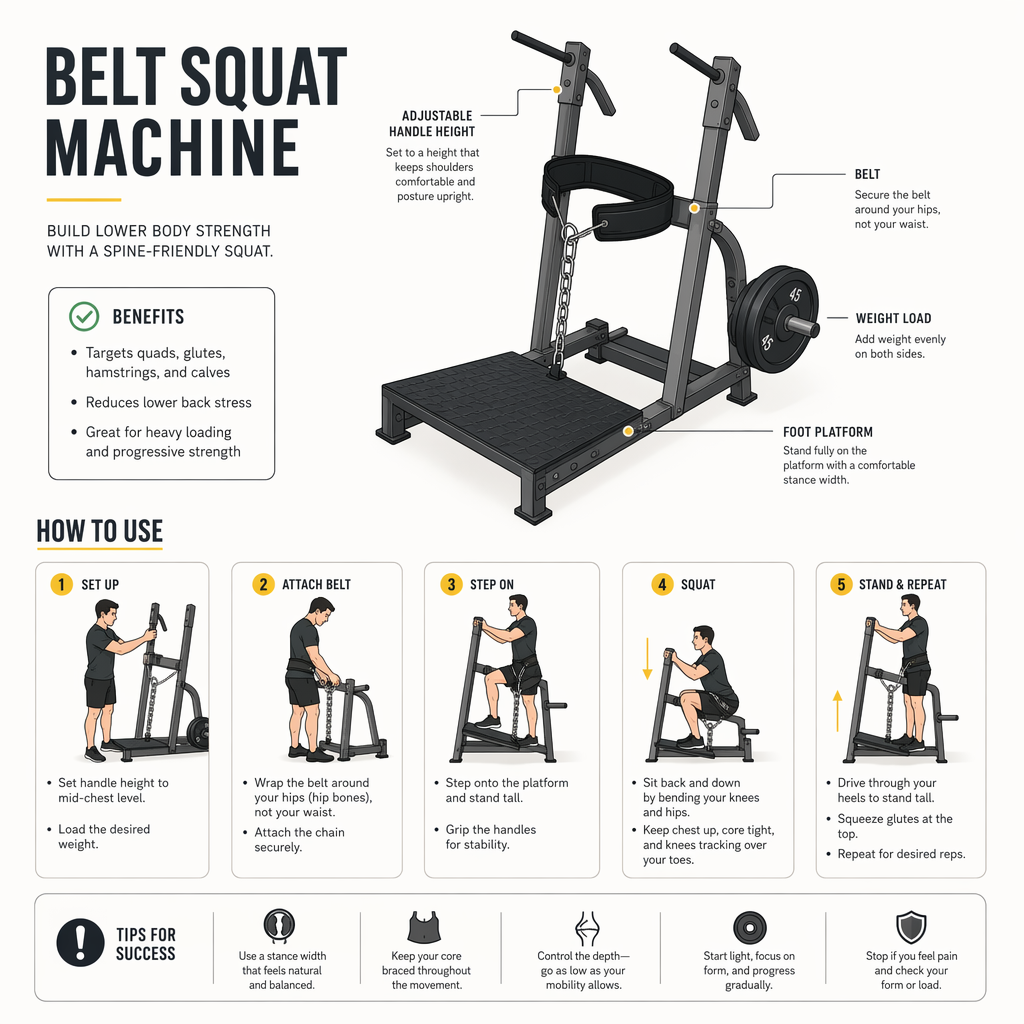
A belt squat is an effective tool when you want hard lower body work with less spinal loading than back squats with a barbell. On a squat machine, the squat belt places loading around your hips instead of your shoulders, which can help reduce lower back discomfort.
That setup still demands solid squat form. When your belt fits well and your stance feels stable, you can train your glutes, quadriceps, and hamstrings for muscle growth while avoiding common setup mistakes. Next, it helps to understand how the movement works and what equipment matters most.
What Is a Belt Squat and How Does It Work?
A belt squat is a squat variation that loads the body through a squat belt fastened around your hips. Instead of supporting weight on your shoulders, you attach the resistance lower on the body. That changes where the loading sits and helps reduce stress on the lower back.
To set up properly, stand on the platform with your feet about shoulder-width apart, and your toes turned slightly outward. The belt should sit snugly around your hips, not too high or too loose. Once clipped in, keep your chest up and your spine neutral.
From there, bend your hips and knees together, lower with control, and drive through your heels to stand back up. Proper form matters at every point. It keeps the movement stable, improves comfort, and helps you target the lower body more directly.
(ALSO READ: Belt Squat Exercises: Build Strength and Power Today)
Essential Equipment Needed for a Safe Belt Squat
For a safe belt squat, you need equipment that keeps loading secure and your body stable. In a commercial setting, a dedicated squat machine often provides the easiest setup. At home, the basics still matter just as much: a reliable belt, a safe loading point, and enough room to move well.
Useful equipment can include:
- A belt squat machine with a platform and loading system
- A supportive squat belt or hip belt that fits snugly
- Weight plates or another secure loading option
- A barbell setup, lever arm, or similar home gym alternative
- Options some lifters look for, such as a Pit Shark or a Spud Inc belt
The main difference between commercial and home setups is convenience and built-in support. Commercial machines are usually more streamlined, while home options may need more adjustment. Either way, your glutes and quads benefit most when the setup feels secure before you begin.
Step-by-Step Guide to Setting Up Your Belt Squat
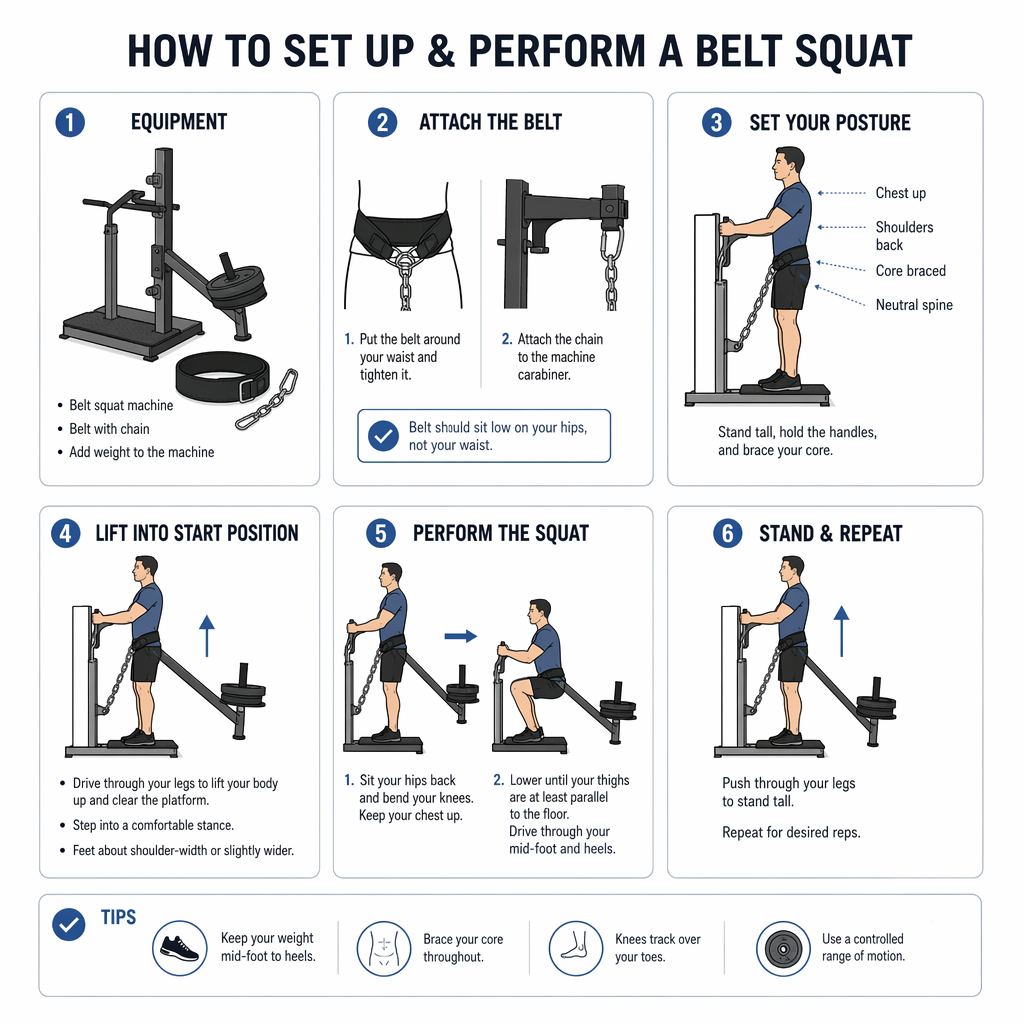
A strong belt squat setup starts before your first rep. On a squat machine, adjust the height so the belt sits comfortably on your hips, then choose a weight that matches your current ability. If you use a lever arm or barbell variation, make sure the loading point is stable.
After that, step into position and check your squat form before moving. Your stance, belt length, and body position all affect comfort and lower body strength output. The next two sections break down fit and loading so you can dial in the setup with confidence.
Adjusting Belt Height and Length for Perfect Fit
Start by placing the squat belt around your hips, where it feels secure without digging in. In a belt squat setup, the belt should sit snugly enough to stay in place during loading, but not so tight that it creates discomfort before you even start.
On a squat machine, adjust the height so you can stand tall on the platform without the belt pulling you forward. If the connection point is too short or too long, your squat form can change in ways that move feel awkward or unstable.
Once the fit looks right, test it with a light load. Lower into a controlled squat and notice whether the belt stays centered on your hips. If it shifts, pinches, or changes your balance, stop and adjust again. A small setup change can make a big difference.
Attaching the Belt, Positioning Yourself, and Loading Weight
Once your belt squat setup is adjusted, attach the belt securely before stepping into your full stance. On a squat machine, make sure the loading system is set and stable. Begin with a lighter load if you are learning the movement, then build up only when your position feels solid.
Use this simple order:
- Fasten the belt snugly around your hips
- Step onto the platform and set your feet shoulder-width apart
- Select your loading carefully and confirm it is secure
- Brace, keep your chest up, and begin with proper form
As you squat, lower with control and push through your heels to stand. Keep your knees tracking with your toes and avoid rushing the movement. That helps you complete your desired number of repetitions safely while keeping the setup efficient and repeatable.
(ALSO READ: Belt Squat Benefits: A Game Changer for Lower Body)
Choosing the Right Belt Squat Option for Your Gym
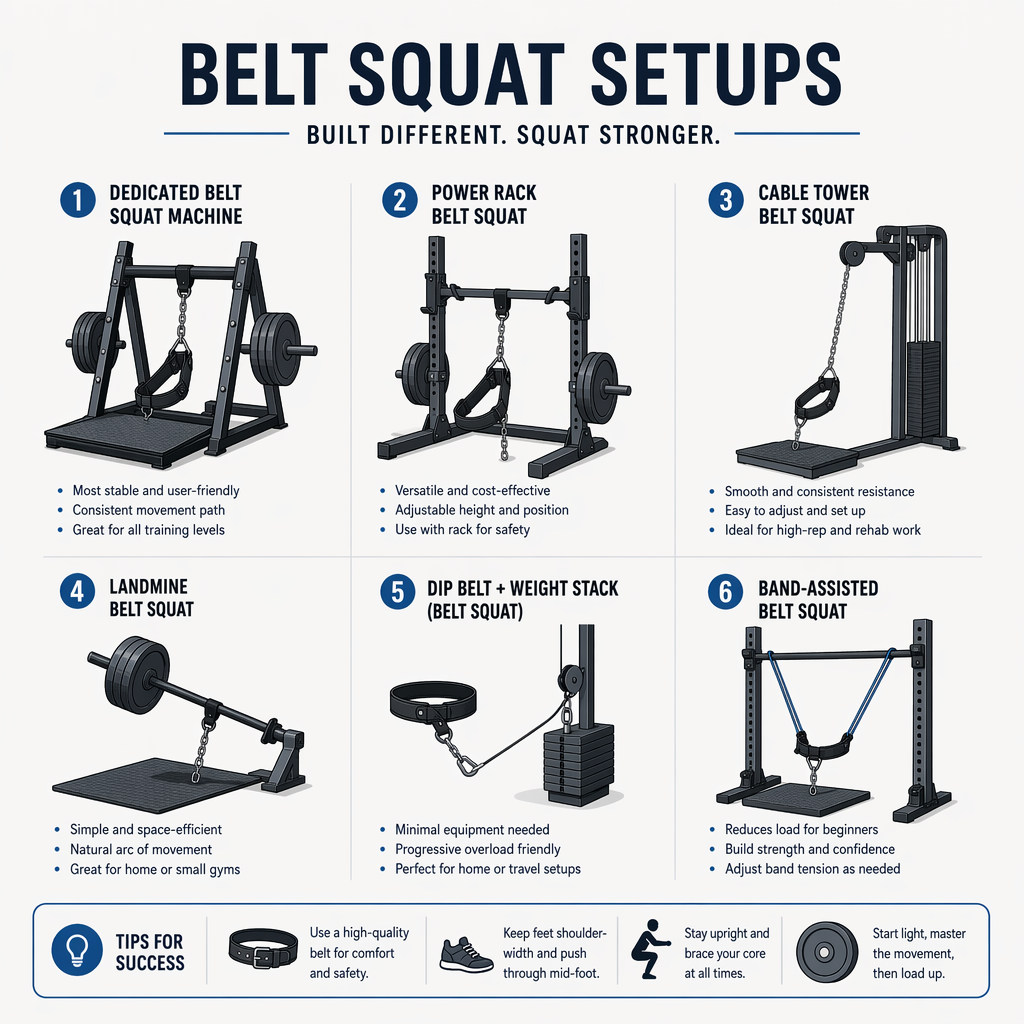
Not every gym needs the same belt squat setup. Some people want dedicated belt squat machines in a commercial space, while others need a more compact option for a home gym. Your choice depends on space, budget, and how much built-in support you want.
If you value ease and consistency, a commercial machine may fit best. If you want versatility, a lever-based or DIY route can work in a smaller gym. Looking at both options makes it easier to choose a setup that supports your training style.
Commercial Belt Squat Machines vs Home Gym Alternatives
Commercial belt squat machines are built for ease, repeatability, and quick adjustments. In many gyms, they offer a stable platform, a clear loading system, and a smoother setup process. That makes them an effective tool for consistent lower body training and muscle growth.
A home gym option can still work well, but it often asks more from you during setup. You may need to manage loading, spacing, and belt adjustment more carefully. For bodybuilders and regular lifters, that tradeoff may be worth it if space is limited.
|
Feature |
Commercial Setup |
Home Gym Alternative |
|---|---|---|
|
Stability |
Usually more fixed and supportive |
Can vary based on equipment |
|
Loading |
Often faster and easier to manage |
May require more manual setup |
|
Convenience |
Designed for repeated use by many users |
Better for smaller spaces |
|
Best Fit |
High-traffic commercial gyms |
Personal training areas and home gym use |
DIY Belt Squat Setups and Creative Solutions
If you do not have a dedicated machine, a DIY belt squat setup can still help you train your legs. The key is keeping the loading low around the hips with a secure squat belt and using equipment that stays stable during the movement.
Some creative solutions people consider include:
- A lever arm setup for a more guided path
- A landmine attachment used with careful positioning
- A squat belt connected to a low loading point
- Starting with lighter weight to learn the movement
- Using dumbbells only when the setup remains controlled
No matter which route you choose, keep the goal simple: safe movement and steady tension through the lower body. DIY options can add flexibility, but they should never feel shaky or rushed. Test your setup first, then build gradually as confidence grows.
(ALSO READ: Belt Squat Muscles Worked: Get the Most from Your Workout)
Conclusion
In conclusion, optimizing your belt squat setup can significantly enhance your workout routine and help you achieve better results. By understanding the mechanics of a belt squat and selecting the right equipment, you can ensure safety and effectiveness in your training. Whether using commercial machines or getting creative with DIY solutions, the key is to make adjustments that suit your body and fitness goals. Remember, a well-set-up workout not only increases your strength but also boosts your confidence in the gym. If you have any questions about setting up your belt squat or want personalized advice, don’t hesitate to reach out for a free consultation!
Frequently Asked Questions
Can I use a landmine attachment for a belt squat setup?
Yes, a landmine can be part of a belt squat setup if you need more versatility in a home gym. Pair it with a secure squat belt, keep the loading controlled, and start light. The setup should feel stable and comfortable before you increase resistance or volume.
REFERENCE:
https://www.ncbi.nlm.nih.gov/pmc/articles/PMC7126258/
https://content.iospress.com/articles/isokinetics-and-exercise-science/ies570